

Light up your builds: the complete LED guide
Most builders assume LED lighting for LEGO and building block sets falls into one of two camps: a simple plug-and-play kit you snap in and forget, or a rabbit hole of soldering irons, resistors, and electrical diagrams. The reality in 2026 is far more interesting. Building block LED lighting now spans a wide spectrum, from model-specific kits that install in minutes to magnetic modular light blocks that snap together just like bricks. This guide cuts through the noise, explains each approach clearly, and gives you the practical knowledge to choose and execute the right lighting setup for your display.
Table of Contents
- What is building block LED lighting?
- A closer look at LED kits and magnetic lighting blocks
- DIY LED lighting: Custom builds for ultimate control
- Key safety, efficiency, and installation tips
- Our perspective: Where creativity meets lighting innovation
- Find the perfect LED lighting kit for your next build
- Frequently asked questions
Key Takeaways
| Point | Details |
|---|---|
| Two main lighting types | Building block lighting includes both LEGO-compatible kits and innovative magnetic blocks. |
| DIY offers flexibility | Custom LED setups provide ultimate control but require careful planning and safety. |
| Safety first | Always match voltage, properly size resistors, and use efficient power supplies to protect your models. |
| Mix approaches for best results | Combining kits and modular lighting lets you achieve spectacular, personalized displays. |
What is building block LED lighting?
Before you buy a single LED, it helps to understand what you’re actually choosing between. The term “building block LED lighting” covers two very different product categories, and mixing them up leads to frustrating purchases.
The first category is LEGO-compatible LED kits. These are purpose-built lighting sets designed for specific models or general brick use. They come with pre-wired micro LEDs, extension cables, and a power hub. You route the wires through your model’s existing gaps and stud holes, and the result is a clean, integrated look. No soldering, no calculations. Just patience and a pair of tweezers.
The second category is modular magnetic LED blocks. Products like LumiBlocks represent a newer concept: lights that are themselves shaped like building blocks, connecting magnetically and passing power through the connection points. These aren’t LEGO-specific, but they bring the same spirit of modular assembly to your lighting setup.
Here’s a quick breakdown of who benefits most from each:
- LEGO-compatible kits: Collectors and display builders who want clean, invisible wiring inside a finished model
- Modular magnetic blocks: Creative builders who want flexible, repositionable lighting for shelves, dioramas, or ambient displays
- DIY builders: Hobbyists with electronics experience who want full control over color, brightness, and wiring layout
- Beginners: Anyone new to lighting should start with a kit before exploring custom setups
The magnetic glowing building blocks category is particularly exciting for builders who love to rearrange and experiment, since the lighting layout can evolve alongside the model itself.
Pro Tip: Before buying anything, ask yourself whether your display is permanent or temporary. A permanent showcase model benefits from a wired kit that disappears into the build. A rotating or modular display calls for magnetic or repositionable lighting instead.
A closer look at LED kits and magnetic lighting blocks
Now that we understand the main categories, let’s put them side by side for a clear view of what each can offer.
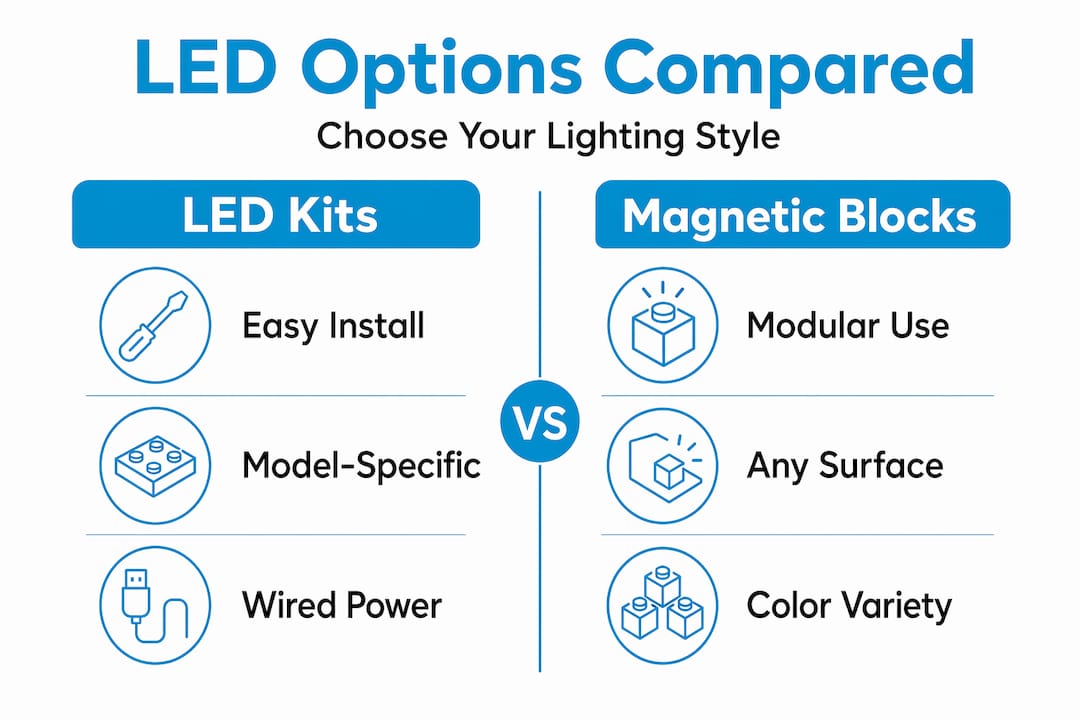
Pre-made LED kits are the workhorses of the hobby. They’re designed around specific sets, which means the wire lengths, LED positions, and power requirements are already figured out for you. A kit for a detailed cityscape or a retro gaming light kit will include lights positioned to illuminate screens, interiors, and architectural details with no guesswork. The tradeoff is modularity: once installed, the wiring is fixed to that model’s layout.
Magnetic LED blocks flip that equation entirely. LumiBlocks V1 snap together magnetically for instant power connection, rotate 360 degrees per block, and can reach up to 1,500 lumens across a 10-block string at 2.6W per block. They support app and voice control, and their color temperature is tunable from warm 2700K all the way to cool daylight 6500K. That’s a level of flexibility no pre-made kit can match.
“Magnetic block lighting brings the spirit of building into your lighting, making it as customizable as your models.” — Experienced modular display builder
Here’s a direct comparison to help you decide:
| Feature | Pre-made LED kits | Magnetic LED blocks |
|---|---|---|
| Installation difficulty | Easy (no tools) | Easy (snap together) |
| Model-specific fit | Yes | No |
| Repositionable | No | Yes |
| Color control | Limited | Full RGBCW + tunable white |
| Max brightness | Varies by kit | Up to 1,500 lumens (10 blocks) |
| App/voice control | Rarely | Yes (LumiBlocks) |
| Best for | Finished display models | Flexible, creative setups |
| Price range | $15 to $80+ | $40 to $150+ |
One underrated advantage of magnetic blocks is their versatility beyond LEGO. You can use them to light shelving units, frame artwork, or add atmosphere to a custom diorama. A Star Wars Diorama light kit gives you a polished, scene-specific result, but magnetic blocks let you create that same dramatic atmosphere for any custom scene you build from scratch.

The honest takeaway: neither option is universally better. Your choice depends entirely on whether you value a finished, invisible installation or an adaptable, evolving lighting system.
DIY LED lighting: Custom builds for ultimate control
But what if the ready-made solutions don’t fit your vision? For the ultimate in customization, here’s how to build your own lighting system safely.
DIY LED lighting for building block displays gives you complete authority over color, brightness, placement, and power. It also demands more planning. The core components are individual micro LEDs (3mm or 5mm are most common for LEGO-scale work), resistors to limit current, and a stable power supply.
Here’s the basic process:
- Choose your LEDs. Pick 3mm LEDs for tight spaces inside models and 5mm for larger, more visible placements. For color mixing, RGB LEDs give you the most flexibility.
- Calculate your resistor values. Use the formula R = (Vsupply - Vf) / I, where Vf is the LED’s forward voltage and I is the desired current (typically 20mA). For a 5V supply powering a red LED with a 2V forward voltage at 20mA, you need R = (5 - 2) / 0.02 = 150 ohms.
- Select your power supply. Add up the total wattage of all your LEDs and choose a supply with 20-30% overhead. For example, 16 LED sheets at 45W each totals 720W, so you’d want a 900W supply minimum.
- Wire in parallel, not series. Parallel wiring keeps each LED at the correct voltage. Series wiring means one failed LED can take down the whole string.
- Test before installing. Run your complete circuit on a breadboard or with temporary connections before routing wires through your model.
Reference values to keep handy:
| LED color | Typical forward voltage (Vf) | Resistor for 5V supply at 20mA |
|---|---|---|
| Red | 2.0V | 150Ω |
| Yellow | 2.1V | 145Ω |
| Green | 3.2V | 90Ω |
| Blue | 3.4V | 80Ω |
| White | 3.4V | 80Ω |
For larger setups, modular LED sheet benchmarks show that 480x240mm panels at 45W each and 10 LumiBlocks at 1,500 lumens are useful reference points when estimating power budgets. Always calculate resistor power dissipation using P = I²R and choose a resistor rated for at least double that value.
The altar light kit is a great example of what a well-executed lighting design looks like in a finished model, and it’s worth studying those wire routing techniques before you attempt your own custom build.
Pro Tip: Wire each LED with its own dedicated resistor, even in parallel circuits. Shared resistors create uneven brightness and increase the risk of one LED drawing excess current and burning out the others.
Key safety, efficiency, and installation tips
As you plan or install your display lighting, some safety tips can save frustration, damage, and even melted bricks.
LED lighting for LEGO and building block displays is low-voltage and generally safe, but a few specific mistakes cause the vast majority of problems. Here’s what to watch for:
- Resistor wattage rating: Always choose a resistor rated for at least double your calculated power dissipation. If your calculation shows 0.5W of dissipation, use a 1W or 2W resistor. This 50% derating rule prevents resistors from running hot and potentially warping nearby plastic.
- Voltage mismatch: Never connect a 5V LED directly to a 12V supply without a resistor or voltage regulator. A 5V LED on a 12V source will burn out almost instantly. This is the single most common cause of LED failure in DIY builds.
- Heat from linear regulators: Linear voltage regulators are simple but inefficient. They convert excess voltage to heat, which can reach temperatures that soften or warp LEGO bricks. Switch to a buck converter instead. Buck converters operate at 85 to 92% efficiency, generating far less heat for the same output.
- USB power for permanent displays: USB power supplies are the safest choice for models that stay lit for long periods. They’re regulated, widely available, and easy to replace. Batteries are convenient for temporary setups but can leak or swell if left in place for months.
- Smart fuses: Adding a small inline fuse or a polyfuse to your power circuit prevents surge damage if something shorts. This is a five-minute addition that can save an entire model.
The 1x4 LED kit format is a good example of how thoughtful product design handles many of these safety concerns automatically, with pre-calculated resistors and regulated power inputs built into the kit.
Pro Tip: Always test your complete wiring setup outside the model first. Lay everything out flat, power it up, and check for heat, flickering, or uneven brightness before you route a single wire through your build. Fixing a problem before installation takes five minutes. Fixing it after takes hours.
Our perspective: Where creativity meets lighting innovation
Now that you’re equipped with practical know-how, here’s our candid view on evolving LED lighting trends in the building block space.
The conventional wisdom in this hobby has always been that lighting is a finishing touch, something you add after the build is complete. We think that framing is outdated, and it’s actually limiting what builders can achieve.
The most impressive displays we see today are ones where lighting was planned from the first brick. Builders who think about light placement, shadow angles, and color temperature during the design phase create something qualitatively different from those who retrofit a kit at the end. It’s the difference between a model that happens to have lights and a model that feels alive.
What magnetic building block lighting has done is lower the barrier to that kind of intentional design. Because magnetic building blocks lighting can be repositioned without rewiring, builders can experiment with light placement the same way they experiment with brick placement. Move a light source, see how it changes the mood, move it again. That iterative process produces results that no fixed kit can replicate.
Our honest recommendation is a hybrid approach. Use a purpose-built kit for the detailed, model-specific illumination inside your build. Use magnetic or modular blocks for the ambient lighting around it. The kit handles the interior drama. The blocks handle the atmosphere. Together, they give you a display that works at every distance, from the close-up detail shot to the wide room view.
The line between being a builder and being a designer is genuinely disappearing. LED lighting is a big reason why.
Find the perfect LED lighting kit for your next build
Ready to light up your latest creation? Here’s where to find hand-picked solutions tailored for enthusiasts.
At BrickiloToys.com, we’ve curated lighting solutions for every skill level and project type. Whether you’re looking for a fast, clean install or a fully customizable setup, the right kit makes all the difference.
Start with the colorful LED lighting kit if you want remote-controlled color variety right out of the box. For builders who love the modular concept, the 1x4 LED building block kit gives you stackable, brick-shaped light units that integrate naturally with your existing builds. And for those who want the full magnetic modular experience, the magnetic glowing building blocks set is the most flexible option in the catalog. We ship worldwide with fast delivery, so your next illuminated masterpiece is closer than you think.
Frequently asked questions
Can I use generic LED strips for LEGO lighting?
You can, but model-specific kits and block-shaped LEDs offer cleaner installs, easier wire routing, and special effects tailored for building block displays that generic strips simply can’t replicate.
How do I pick the right power supply for my lighting?
Calculate your total LED wattage and choose a supply with at least 20 to 30% extra capacity to ensure stable, reliable operation and prevent the supply from running at its maximum limit continuously.
What’s safer, battery or USB power for displays?
USB is the safer and more reliable choice for permanent LEGO lighting setups, since it provides regulated power and avoids the battery swap cycle; batteries can leak or swell when left in place for extended periods.
Why did my LEDs burn out after installation?
Most LED burnout comes from voltage mismatch or missing resistors in parallel circuits, both of which cause individual LEDs to draw far more current than they’re rated to handle.
Can magnetic LED lighting blocks work with LEGO?
While not explicitly designed for LEGO, magnetic LED blocks like LumiBlocks can be creatively integrated with custom mounting solutions to produce unique ambient and accent lighting effects around and behind LEGO displays.